So I hear you want to climb a mountain....
How F I T do you feel to tackle that hike you’ve been dreaming about? Maybe it’s something daunting like Wedgemount or something more mellow like Elfin Lakes. Whatever your adventure of choice may be, myself and Lynn from What Lynn Loves Blog have got you covered - we’re bringing you our 5 favourite hikes this summer season! You can check out her rendition here www.whatlynnloves.com/whistler/crater-rim-trail-hike
We started with a beginner level hike, Cheakamus Lake which you can find HERE and will be increasing in difficulty over the coming months to help you conquer whatever hike you want to tackle! Along the way, I will be providing progressive exercises to get you strong and fit so you can take on any adventure feeling confident and coming out pain and injury free.

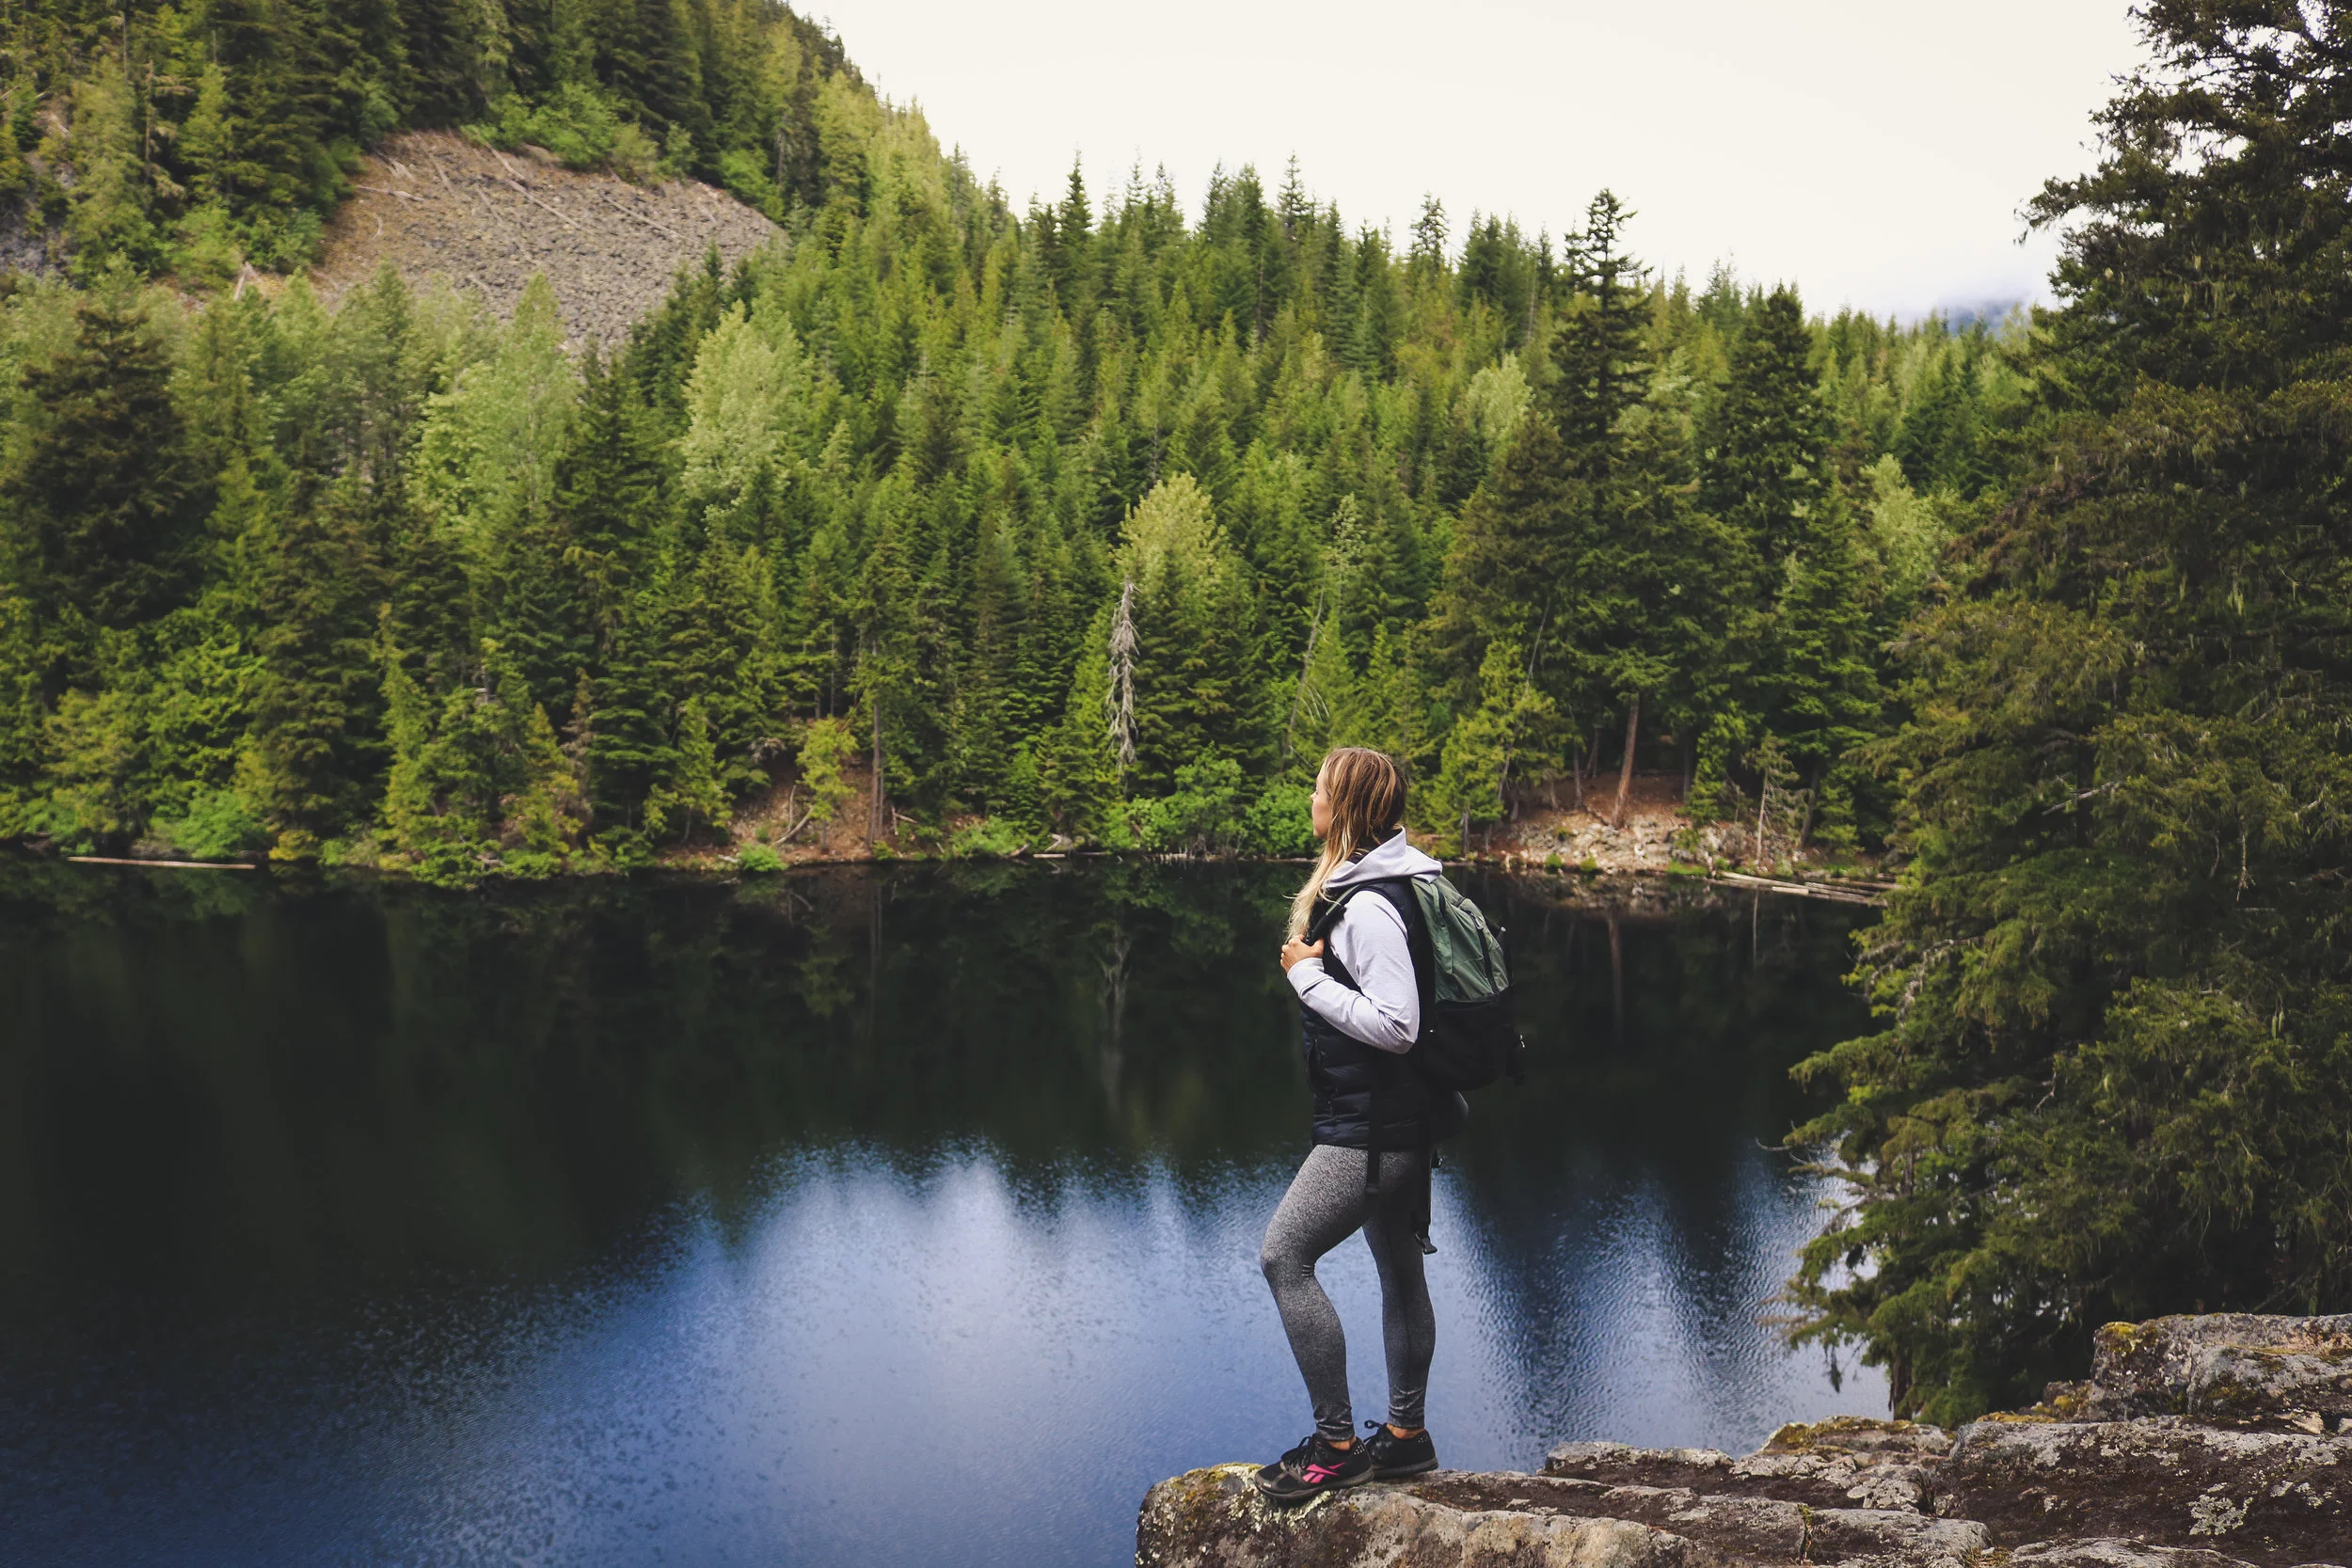
Hike #2 - Crater Rim Trail & Logger's Lake
Searching for a hike that’s moderate, very quiet and rather unknown to the general public? Look no further than one of the best kept secrets in Whistler – Logger’s Lake. Don’t let the name fool you; this lake has an interesting history that far precedes the existence of logging workers. This hidden gem deep in the Whistler Interpretive Forest, which lies in the territories of the Lil’wat Nation and Squamish Nation, was formed at the base of a 10,000 year old extinct volcano! The history becomes apparent when you look around and see that you’re surrounded by crumbling walls of a bowl-shaped crater that is laden with beautiful hiking and biking trails to enjoy.

Starting the ascent of the Crater Rim Trail


First sights of Logger's Lake and beyond
It takes a quick 10 minutes to get to the lake - that's the easy bit. Once you reach Logger's Lake and you snap a few photos to take in all it's glory, it's time to get the hike started so you can see the view from the top! The ascent starts strong but clear with a climb over roots, rocks but nothing too difficult - which makes it the perfect intermediate level for our second hike. The elevation gain is 314 m and the length is around 4.5 km which took us 3 hours, but we stopped to take lots of photos and to enjoy snacks! Speaking of eating....

Did I catch it?!

Time for good and a good view featuring my personal favourite, coconut clusters!
I often get asked about what food I bring on my hikes and, in fact, it's a running joke with my friends that I never leave home without snack of some sort... and it's true! Even on short hikes, I always like to bring some sustainable fuel to keep me going. For those of you who don't know, I have a chronic auto-immune disease called Rheumatoid Arthritis that limits the types of food I can have so needless to say, it's a huge challenge to find healthy, easy, and portable snacks. Luckily, I have found the incredible brand Hippie Snacks that offer products that are organic, dairy-free, gluten-free and freaking delicious! They're made with nothing but real organic fruits, veggies, nuts, seeds & grains seasoned with natural ingredients for a super satisfying snack that you don't feel bad about. They make my belly, my brain and my body very happy!

I could tell you more about the hike but I'll let Lynn tell you the rest on her blog HERE.
Now it's time to get to the good stuff - the E X E R C I S E! The last instalment built your foundation with with the fundamentals - squats, dead bugs, and lunges. (You can check it out HERE if you haven't already.) Now it's time to up the ante and get you working harder so you can get H I K I N G S T R O N G E R! We will focus on more challenging exercises, specifically single leg work because isn't an intense hike really just a bunch of lunges going up a mountain?
It's important to remember that one of the best ways to get better at hiking is… well… hiking! Putting in the kilometres is a surefire way to improve your fitness. You always want to ensure you're incorporating more elevation gain to challenge you further, which is why we chose this hike. It may not be longer but it certainly is more challenging than Cheakamus Lake! With that being said, there are certain tactics to improve and enhance your hiking experience - we can use targeted exercises to build your strength and stability so you can enjoy a long day up (and down!) the mountain and walk away from it free of back and knee pain.
Workout #2 - The Level Up
For this instalment, our focus is to build upon the foundation you started 3 weeks ago. By now, your squat should be solid and your dead bugs should feel easy. Here's the exercises we're going to use to level you up:
1. weighted SQUAT
Now that you've mastered the technique of the bodyweight squat, it's time to add resistance to make it stronger and more challenging. You can add a dumbbell, kettlebell, barbell, loaded back pack, toddler, ANYTHING to give you the resistance you need.
Stand with your feet slightly wider than shoulder width (keep in mind that foot position varies from person to person so go with what feels comfortable for you). Your toes should be pointed slightly outward – about 5 to 20 degrees outward.
At the top, engage your core to keep your spine in a neutral position, i.e. don’t round or hyperextend (over arch) your back. Think about 'bracing', like someone is going to punch you in the belly, then maintain this core tension throughout each rep.
Think about ‘turning two dials’ outwards underneath your feet to create tension in your glutes. We call this "spreading the floor" which provides proper knee and pelvic stability by engaging the powerful glute complex.
Next, initiate the movement by hinging at the hips and sending your butt back slightly prior to dropping down into the squat (this is important to place the emphasis of the movement on the large muscles of the hip joint as opposed to the smaller knee joint).
As you squat down, focus on keeping your knees in line with your feet. Many new lifters need to focus on pushing their knees out so their knees don't collapse inwards. Do not allow the knees to fall inside of the feet! We call this "spreading the floor" - imagine you're ripping a piece of paper underneath your feet in half.
Aim to reach a parallel depth, which means your hip crease is in line with the top of the knee. Also, the angle of your spine should roughly match the angle of your shin if you were to look at yourself sideways. No more of this "knees can't go over toes rubbish"! If you have questions as to why, send me a message.
To ascend, drive through the heels while “spreading the floor” to obtain power from the glutes and to keep the knees aligned. Maintain neutral spine with a braced core until the ‘lockout’ is reached at the top of the movement.

Top position of the squat

Note that back and shin angle are roughly parallel

Top position, holding dumbbell in 'goblet' grip
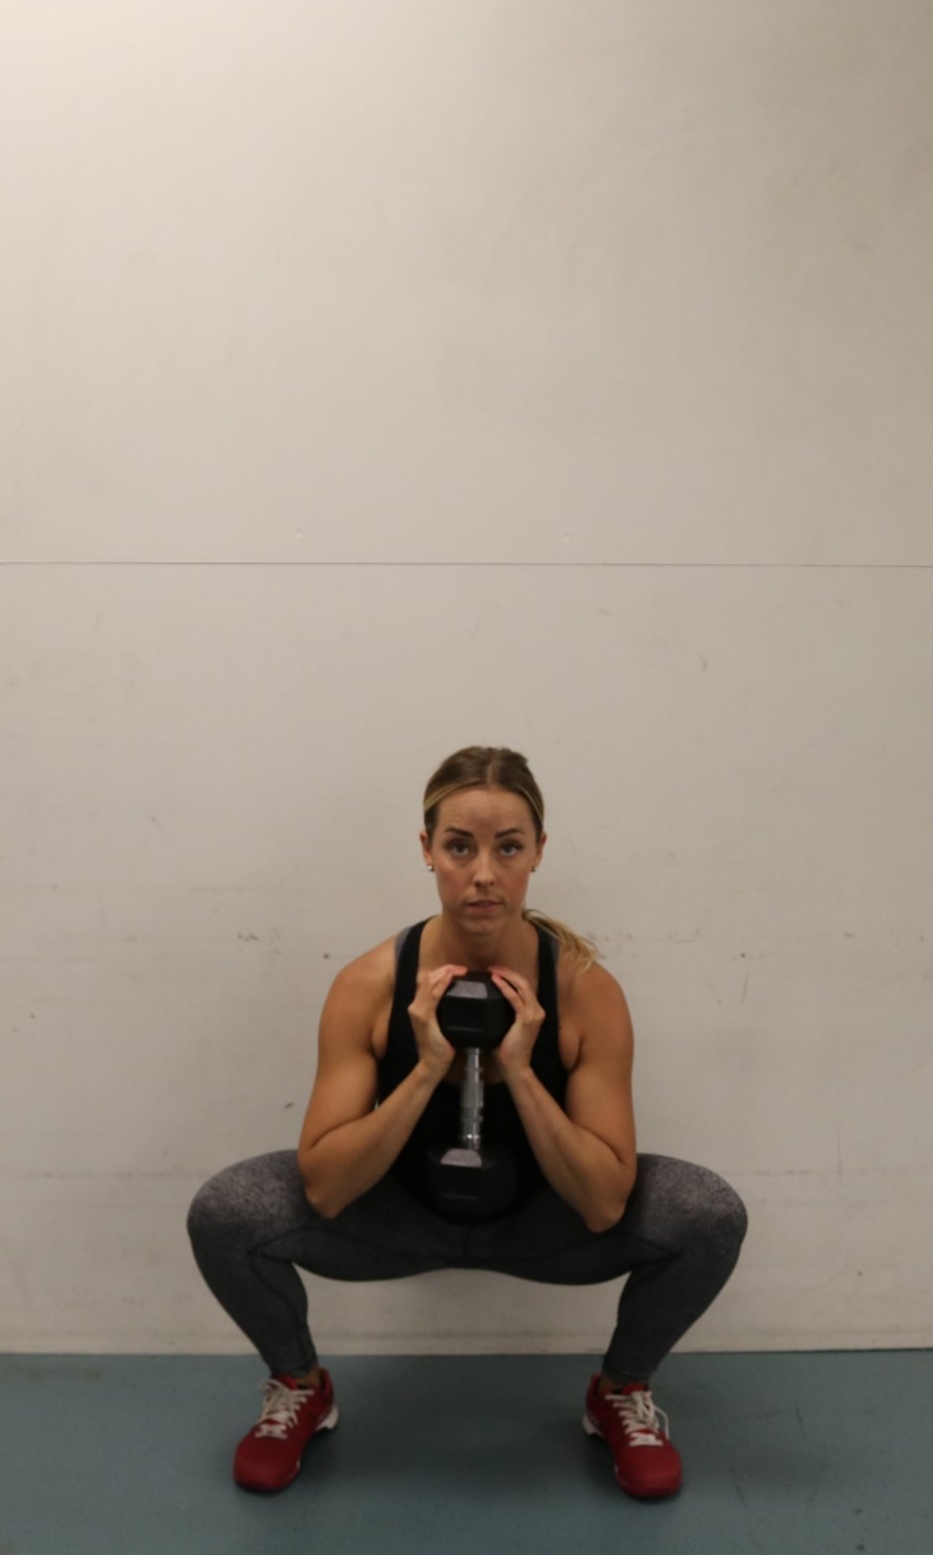
Bottom position, keeping knees aligned with feet
2. Bulgarian split squat
We're taking our lunge to the next level with the Bulgarian split squat, also called rear foot elevated split squat, or Bulgarians for short. It is paramount for hiking that we have solid single leg strength and this exercise is one of my favourites for building just that.
It's important to remember that the working leg should be the FRONT LEG. It is common to see people pushing off the back leg but this will do nothing to strengthen your leg muscles or improve your stability.
Initiate by placing back foot on top of a box, table, or bar in a comfortable position that you can maintain throughout the set. Ensure there is width between your feet as well as enough distance that you can comfortably lower yourself down.
While maintaining a braced core with neutral spine, initiate the movement through the hips by hinging back and keeping the weight in your heel - this allows focus on the powerful hip musculature which will power you up those slopes. Then lower your butt down towards the heel of your standing leg with slow control - don't just drop down! Go as far as your flexibility and strength will allow. Ideally, you will lower yourself until your back knee is hovering above the ground but this may take time to build up the necessary strength.
Keep a slight hinge forward through the hip so that your body weight is shifted over the middle of the front foot. Again, this encourages utilizing the strength of the front leg to return to the start position as opposed to kicking off the back leg.
To initiate the ascent, drive the heel into the ground to active glutes and use your front leg to push yourself up to the start position. Watch your knee alignment - do not allow the knee to collapse inside of the foot.
Notice that the position at the bottom of the split squat looks very similar to the position of the regular squat - angle of the spine should be parallel to the angle of the shin. Remember, the weight is over the front leg and the back leg is there for support and nothing else.

Start position of the Bulgarian

Bottom position of the Bulgarian

Pay attention to your knee alignment
4. romanian deadlifts (two legs)
After mastering the hip hinge pattern of the glute bridge, it's time to learn the Romanian deadlift which focuses on core, hamstrings and glutes. We need strong glutes to protect our knees and lower backs from overuse injuries that can happen during our long-duration activities.
Standing with feet hip width apart and toes pointed directly forward, contract the core and initiate the movement by hinging the hips, pushing your butt behind you while keeping a soft knee. Go as far as you can until you feel a stretch in the hamstrings - if you go any further, you will only round through your lower back which isn't safe so please be mindful of your limits. Your back should be neutral and your core should be engaged to prevent rounding or overarching in the lower back.
Ensure your knee alignment is staying stacked above your ankles - do not let the knees collapse inwards. Imagine you are "spreading the floor" throughout this exercise too.
To return to the start position, imagine squeezing your glutes to push your hips forward to the top position. If it helps, think about tucking your tailbone under while you lockout at the top of the movement to ensure you are not overarching, which I frequently see in this exercise.

Start position of the RDL

Notice that neutral spine with engaged core to prevent arching or rounding
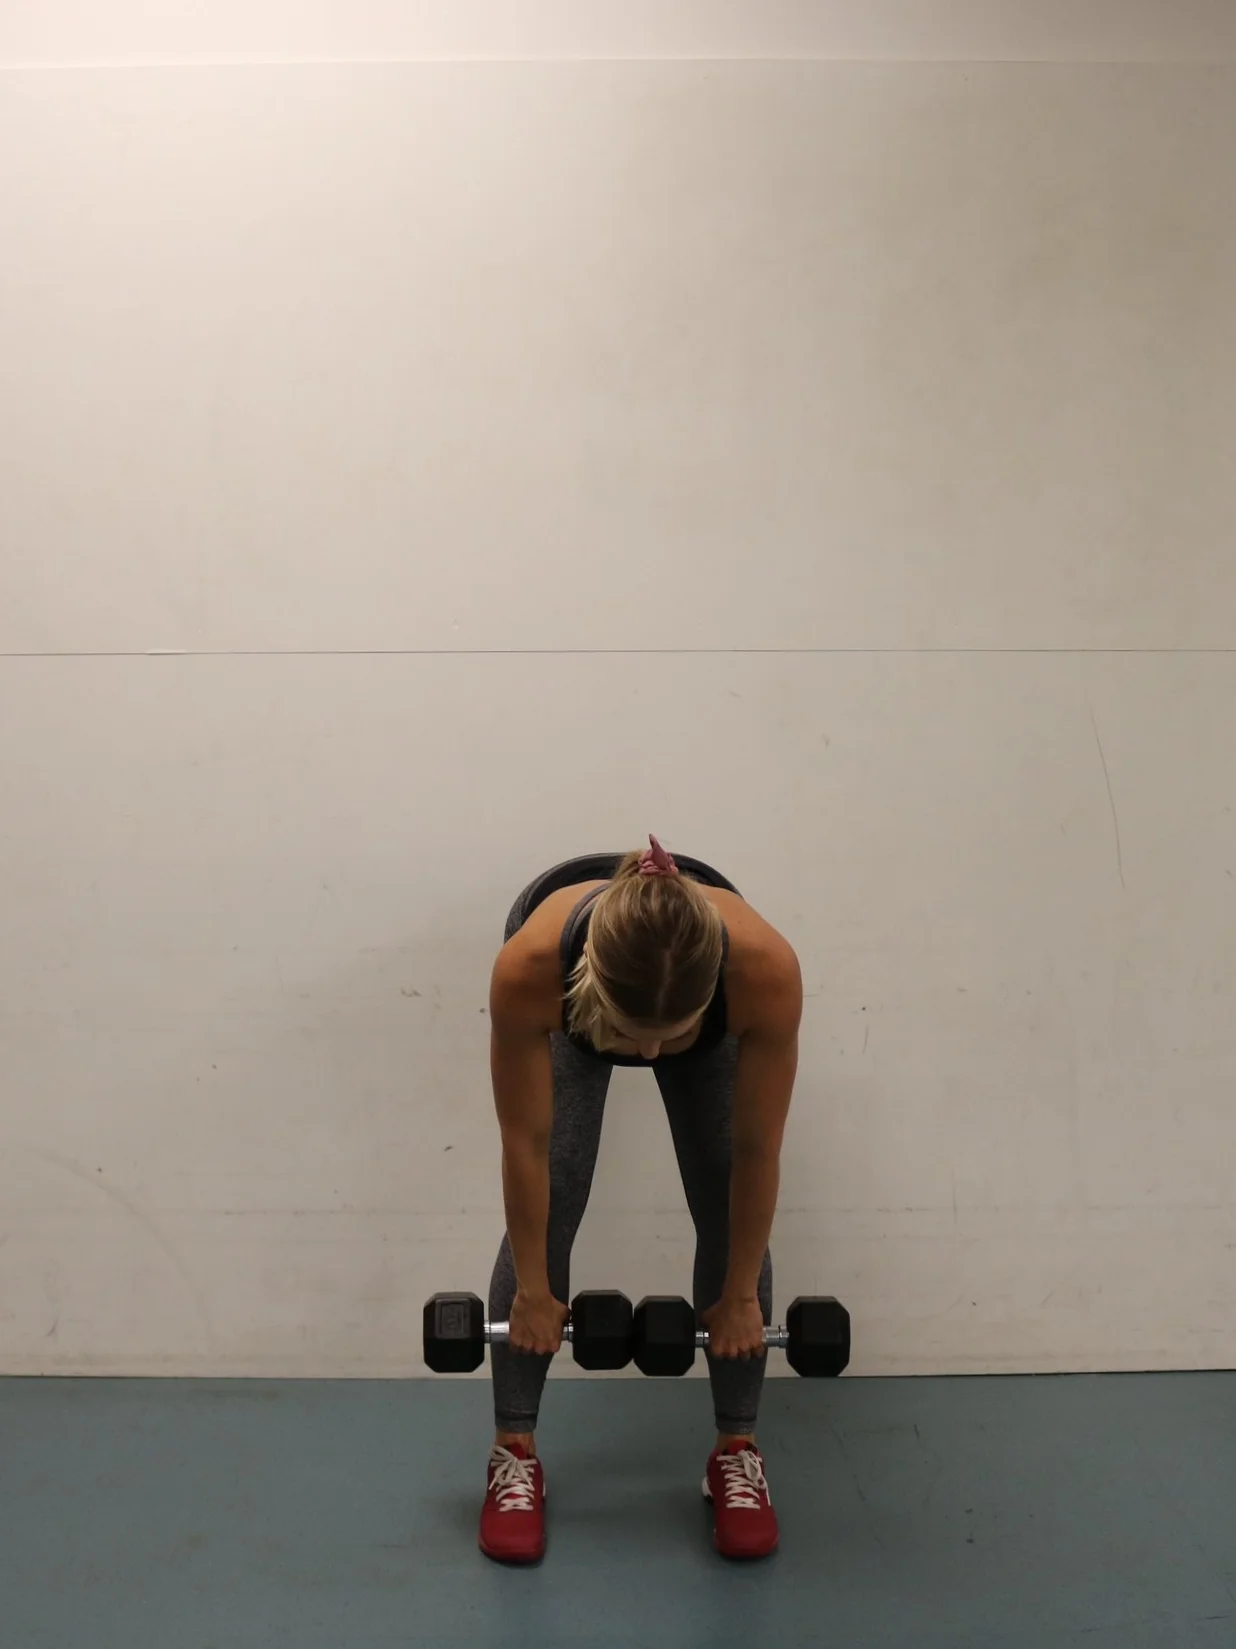
Front angle to show foot position
3. weighted SINGLE LEG ROMANIAN DEADLIFT
Now that you've mastered the single leg RDL as we trainers endearingly call it, it's time to increase the challenge and add some weight! This exercise is one of my favourites - it targets hamstrings, which MUST be strong to balance out our dominant quads, and the glute medius which stabilizes the knee and pelvis, which is paramount to preventing injury.
It is important to remember that the leg you are strengthening is the standing leg, not the one that you are extending behind you.
While maintaining a braced core with neutral spine, initiate the movement by hinging through the hips of the standing leg. Maintain a soft knee as you push the hips back while reaching down towards your toes. The back leg will lift simultaneously as the chest lowers towards the ground. Imagine there's a broomstick attached from your head to the heel of your back foot to keep everything aligned.
In the bottom position, your hips should both be pointed towards the floor, i.e. there shouldn't be any rotation otherwise we are not properly strengthening the glute medius or hamstrings.
To return to the start position, push through your heel and contract the glute of the standing leg and drive your hip forward until you lockout at the top position.

Start position of the single leg RDL

Bottom position of the single leg RDL - keep hips squared towards the floor

Keep knee soft and push hips back
5. Torsion control
Now that you're dead bugs are dialled, it's time to incorporate a anti-rotation exercise. A strong deep core keeps our backs supported and safe during long hikes especially if you’re carrying a backpack.
Start in a hand-plank position with hands directly under shoulders, feet shoulder width apart and weight distributed evenly between hands and feet.
Engage your core to create stability. Remember that this is an anti-rotation exercise so the point is to control (i.e. prevent) rotation by keeping your core BRACED. If it looks like you're not moving, then you're doing it right!
While holding your core tight, reach over and tap the opposite elbow in a slow and control fashion (should be 1 tap per second, no faster). Start with 5 taps per side and build up to 15 per side to improve core endurance.

Hang-plank position to start

Tapping each elbow, keep hips from rocking

Tapping other elbow maintaining stable hips
5. Lateral band walks
We often forget about training laterally, or sideways, movements when it comes to training but incorporating exercise like the lateral band walks strengthen the glute medius which helps to prevent chronic knee and back pain and injury often sustained in our endurance activities like hiking.
Place a medium or heavy fitness loop just above the knees, or below the knees if you want to make it more challenging.
Hinge through the hip to set your hips back and to load the glutes. Initiate the movement by stepping sideways with the 'forward' leg while stabilizing with the 'back' leg. Think about opening your knees wide to lead the movement instead of leading with your feet, which can cause the knees to fall inside the feet leading to an ineffective exercise.
Ideally, you should feel this on the upper sides of your glutes on both sides. The form can be tricky on this so please let me know if you have any questions!

Start with feet narrow

Do not let knees collapse inwards

Keep knees pressing wide

Maintain hip hinge position throughout
I recommend for a beginner to complete 3-4 sets of each exercise for 8-15 reps. Intermediate level exercisers can complete 5-6 sets of each exercise.
Stay tuned for next instalment where we’ll be adding more challenging exercises to get you
M O U N T A I N S T R O N G.
These are just a few examples of exercises that will get you fit this hiking season. If you want to learn technique or are looking to expand your exercise library, get in touch and I'll get you on the road, er, trail to success!
Did you do the hike?
Don't forget to tag #PeakTraining and #WhatLynnLoves
in your post so we can follow your adventures!
#PTxWLL
Photography by Bryn Peaker & Jessie Byrne
